Projektmanager HPV (en)
- Overview
- Projects Local
- Projects Repository
- Repository mechanism
- Project Sharing/Structuring
- Project types
- Universal
- ETS6
- Gira Home-/FacilityServer
- Gira Project Assistent GPA
- Basalte Studio/Core
- Theben LUXORplug
- Telenot compasX
- Telenot hipas
- Loxone
- Others
- Notes
- Passwords
- Private-Mode
- Remote Access
- History
- Settings
- Licensing
- Trouble Shooting
Overview
The PM manages your SmartHome projects for perfect teamwork and automatically takes care of opening the correct software for editing, preventing simultaneous editing by others and providing all the necessary data and tools as well as notes, documentation and passwords required for the best possible project support. All project data can be stored on central data storage devices such as servers, NAS or cloud (OneDrive/SharePoint/Nextcloud/Dropbox/etc.), which serve as an exchange platform. Up to 10 different central storage locations can be configured and enable customized structuring to suit every company. This also makes it possible to exchange data with other companies. All processes are also recorded in log files and ensure end-to-end traceability.
Main window of the Projektmanager
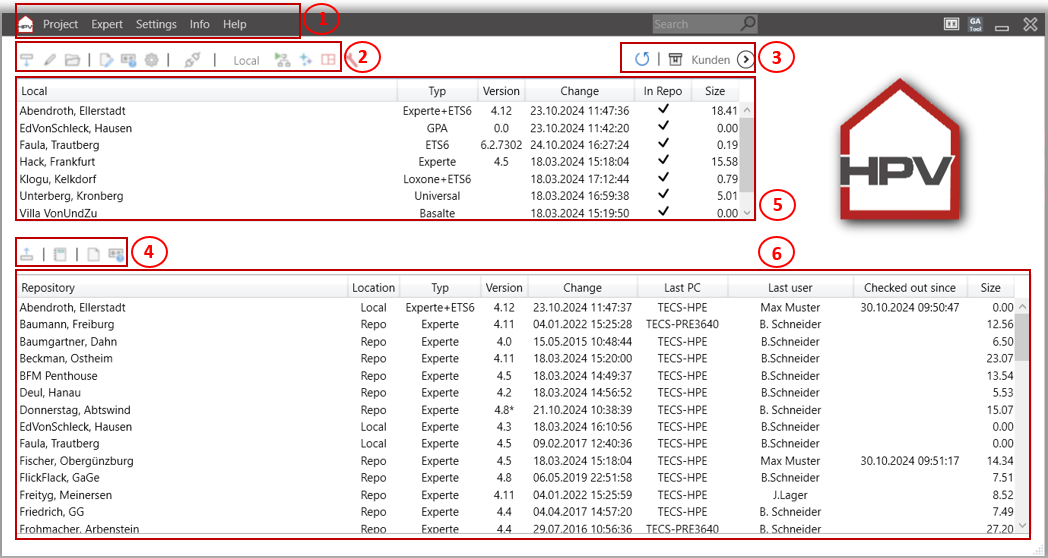
5. List of projects that are checked out locally on the PC for editing.
6. List of projects that are available in the central repository for all users.
Projects Local
Operation is via the menu icons or the context menu of the project lists.
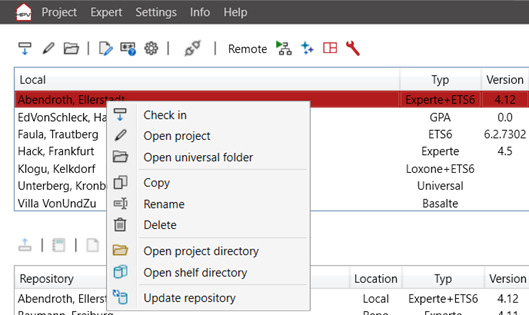
- "Check in" The project is moved to the central memory. See also "Repository mechanism".
- "Open project" Opens the project with the corresponding software. Also possible by double-clicking.
- „Open universal folder” Each project has its own universal folder for storing any project-related data.
- "Copy" Copies the project and asks for a new name.
- "Rename" Assign a new name for the project. The project in the central memory is not changed.
- "Delete" Deletes the project from the project directory.
- "Open project directory" Opens the project directory. Only required for exceptions.
- "Open shelf directory" Opens the directory in which old project statuses are stored. Only required for exceptions.
- "Update repository" The project is updated in the repository, but not checked in.
- Further project type-specific points. See project types.
Projects Repository
Operation is via the menu icons or the context menu of the project lists.

- "Check out" The project is copied to the local project path and unpacked. See also "repository mechanism".
- „Undo check-out" If the project has been checked out, this can be undone. The checked-out project is not removed.
- „Open History“ Opens the history. Also possible by double-clicking on the project line.
- „Delete“ Deletes the project in the repository.
- „Open project directory" Opens the directory of the checked-in project file. Only required for exceptions.
- "Open shelf directory" Opens the directory in which old project statuses of the repository archive are stored. Only required for exceptions.
- „Move project" Moves the project to another repository unit.
Repository mechanism
No current data is deleted when projects are checked in and out. Under "Settings", you define how many project statuses per project are to be saved for each repository path. For local projects, 5 statuses are defined as unchangeable.
Local projects are compressed during check-in, copied to the repository and the local project is moved unchanged to the local project shelf. The compressed file in the repository and the unpacked local folder are given a time stamp.
When checking out, the repository project is unpacked in the local folder and the packed file is moved to the repository shelf.
The repository shelf projects can be imported directly into the PM. Alternatively, the ".hpvarc" file can also be unzipped with e.g. "7zip" and opened directly with the corresponding manufacturer software at another repository location.
However, these processes are only relevant in an emergency and are not the rule.
Paths of the local project data:
C:\Users\<USER>\AppData\Local\SmartHomeTools\ProjektManager\Projekte\SpeicherXX
C:\Users\<USER>\AppData\Local\SmartHomeTools\ProjektManager\Projekte\AblageXX
Paths of the repository project data:
<INDIVIDUALREPOSITORYPATH>\Archiv_Projekte
<INDIVIDUALREPOSITORYPATH>\Archiv_Ablage
Project Sharing/Structuring
It is possible to create several repository locations (e.g. server, NAS or cloud (OneDrive/SharePoint/Nextcloud/Dropbox/etc.).
You can select up to 10 directories in the settings. A selection is displayed in the main window, which you can use to switch between them.
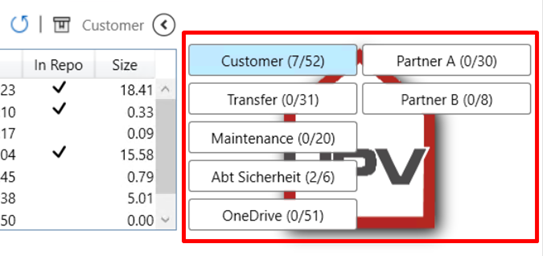
It is possible, for example, to realize joint project planning with other companies or to manage internal projects in a structured manner.
Once a project has been checked in, it can be moved to any other repository. To do this, simply use the context menu (right mouse click) in the repository list.
Project statuses in the repository shelf (see "repository mechanism") are not moved.
If a project has been successfully moved, the PM automatically creates an entry in the respective log file.
Project types
Various project types/manufacturer projects can be imported and managed via the PM. You will find the available ones in the following sub-items. More will follow.
It is possible to link KNX-typical project types such as HS, GPA, Basalte, Loxone etc. with ETS projects and make them available in one. You create the link in the respective project setting under "ETS project/Attach".
Tip - If you often work with several technicians on a project at the same time, e.g. Technician#1 = ETS and Technician#2 = HS, then it is advisable to dispense with the combined project types and create a project for each project type.
Each project type now also has the features of the “Universal” type.
IMPORTANT - Please note that a project name may only exist once. If you have a project for which you need several project types, add the type to the project names. E.g. "Schneider, Frankfurt - GPA" and "Schneider, Frankfurt - ETS".
Universal
The "Universal" project type provides a classic project folder that can be used with all PM benefits as a project folder for "not yet integrated" project types. Please note that the file size affects the check-in/check-out process and the backups are correspondingly larger. We recommend that you only store configuration files here, for example, and keep them to a maximum size of approx. 200 MB.
Create:
Use the "Project/Create/Universal" menu to create a new project.
Import of inventory data:
Not possible. First create a new project and then copy the relevant data as described in "Edit".
Edit:
Double-click on the project in the project list, on the button in the menu or right-click on “Open universal folder” to automatically open the available project folder in the file explorer. Copy and edit any files and folders in this location.
Combined project type:
ETS projects can also be attached to this project type.
ETS6
The management of ETS6 projects is based on the ETS6 collaboration mode, which you must activate in the ETS under “Settings/Data Storage/Collaboration mode”. The path set in the ETS for the project archive does not need to be adjusted and can be retained locally if PM is used consistently.
Inventory data import:
There is no direct import. ETS6 projects are linked to a PM project. To link a project, the ETS project must have been saved once in the ETS archive. After you have selected "Project/Create/ETS6" in the PM and assigned a name, you can select the relevant ETS project via the dialogue. This process can be repeated at any time via the PM project settings. It is also possible to attach several ETS projects to a PM project. In the background, the ETS project is moved from the ETS archive folder to the PM project folder and linked by a special function so that the project is offered in the ETS archive.
Check in/Check out:
To be able to check a PM project into the memory, the ETS project must first be checked into the ETS archive and unlocked. If this is not the case, you will receive a corresponding message.
If the PM check-in process was successful, the project has been removed from the ETS archive. The ETS project only becomes visible again in the ETS archive and can be processed further once it has been checked out in the PM.
Edit:
Double-click to automatically start ETS6 if it has not yet been opened.
Combined project types:
It is also possible to link to KNX-typical project types such as HS, GPA, Basalte, Loxone etc. with ETS projects and make them available in one. You create the link in the respective project setting under "ETS project/Attach".
Tip - If you often work with several technicians on a project at the same time, e.g. Technician#1 = ETS and Technician#2 = HS, then it is advisable to dispense with the combined project types and create a project for each project type.
Gira Home-/FacilityServer
Create:
You can create a new project in the desired version via the "Project/Create/HS-FS" menu. This is a project template without any default settings. We recommend working with a self-created template project that contains your typical company standard configuration. If necessary, you can check it out, copy it and set it up with a new project name.
Inventory data import:
Using drag & drop or the "Projects/Import" menu, you can simply drag a .zip file created by the Expert into the "Projects Local" window. Only use export files from the Expert software. Self-packed .zip files can lead to problems.
Edit:
Double-click to automatically start the correct Expert in the required version. If this is not installed, you will receive a corresponding message. After installing a new Expert version, you must restart the PM so that this version is available.
Project update:
By right-clicking on the checked-out project, you can update the project files. This will update some files in the project and the PM will open the project in the new Expert version in future. A firmware update must then be carried out manually via the Expert. This procedure is not recommended by Gira and is carried out at your own risk. No problems are known to date.
Clean up:
A project originally exported by the Expert contains all templates, plugins and logics that were used in the project. As these are not required by the PM function "Expert Sync" (described in the next sub-item), this can also save a lot of storage space in the backups. The files are not deleted, but moved to a special directory in "<RepositoryPath01>\_ExpertenTools". Over time, this creates a central equipment archive that can be accessed at any time. However, this is not usually necessary.
You can find this function by right-clicking on the checked-out project.
Synchronize experts:
Expert installations can be synchronized between computers, which can be found in the main menu under "Expert". All templates, plugins and logic modules are synchronized with the folder "<RepositoryPath01>\_ExpertenSync".
The first synchronization (e.g. new computer or new expert version) may take a very long time. A sync is only possible with active repository functions. If new data is available in the Expert Sync function, the button changes color until a sync has been performed. This ensures that all computers have the same Expert configuration. This function can be used from Expert version 2.10. Older versions are ignored.
Central addresses & read flags:
You can use this function to automatically connect central addresses and set read flags. If you have checked out and selected an Expert project, you will find a corresponding button in the Project selection menu. This function is permanently in beta status and can be used at your own risk. It is recommended that you create a backup of the Expert or PM project before using it. You will find exact details on how to use this function when using the respective function.
QuadClient & online functions:
You can store and also start the QuadClient Windows client access data for internal and external access directly via the PM. You do not need to install any additional software. The download is automatic.
Once the data has been entered, it is available on every computer after check-out.
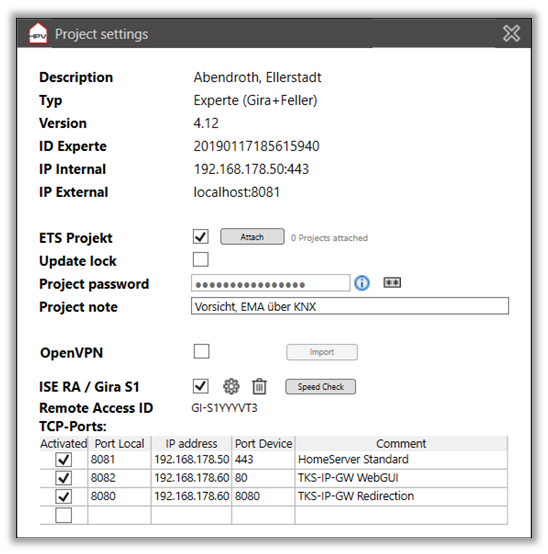
You can also use a button to open the HS debug page in a web browser. All buttons for this can be found in the "Project selection" menu. The internal and external address is automatically obtained from the Expert project. If you have set up the HS/FS as a DHCP client, please activate the fallback address in the Expert project and enter the current IP data for the PM functions there. The external address including port is obtained from the Expert project settings/project. For access via S1/ISE-RA, enter "localhost:8081" here.
Combined project type:
ETS projects can also be attached to this project type.
Gira Project Assistent GPA
The GPA from version 5 works with individual databases per GPA project. The connection to the PM projects was realized via the project name. The project name of the PM project must be included in the GPA project name.
Create:
Create a new project in the desired GPA version and observe the naming rules as described in the next point "Import".
Inventory data import:
There is no direct import. Create a new project of the type "GPA" in the PM and transfer the name to the GPA project that you want to link to the PM. It is possible that the GPA project name is extended. For example, PM project "Schneider, Frankfurt" can be named "Schneider, Frankfurt (1)" or "Schneider, Frankfurt Backup 24-12-01" in the GPA. There may also be several GPA projects that contain the PM project name.
Edit:
Double-click to automatically start the correct GPA in the required version. If this is not installed, you will receive a corresponding message. After installing a new GPA version, you must restart the PM so that this version is available. If you want to edit the project in a newer version, simply start the newer GPA manually and edit the project. The PM will recognize this and take it into account in future.
Check in/out:
If you check in the PM project with the type "GPA", the system checks which GPA projects exist and contain the name. All corresponding projects are moved to the PM project and then checked in. The GPA is therefore tidy and clearly organized.
Combined project type:
ETS projects can also be attached to this project type.
Basalte Studio/Core
Create:
Create a new project via the "Project/Create/Basalte Core" menu.
Import existing data:
Using drag & drop or the "Projects/Import" menu, you can simply drag an existing project file into the "Projects Local" window.
Edit:
Double-click to automatically start the "Basalte Studio" software. This should have been installed at the original installation location. If it is not installed, you will receive a corresponding message.
Combined project type:
ETS projects can also be attached to this project type.
Theben LUXORplug
Create:
Use the "Project/Create/LUXORplug" menu to create a new project.
Import:
You can simply drag and drop an existing project file into the "Local Projects" window or via the "Projects/Import" menu.
Edit:
Double-click to automatically start the "theben LUXORplug" software. This should have been installed at the original installation location. If it is not installed, you will receive a corresponding message.
Combined project type:
ETS projects can also be attached to this project type.
Telenot compasX
Create:
No direct creation possible. Create a new project using compasX software and continue with the import.
Import existing data:
Using drag & drop or via the "Projects/Import" menu, you can simply drag an existing project file into the "Projects Local" window.
Edit:
Double-click to automatically start the "compasX" software. This should have been installed at the original installation location. If it is not installed, you will receive a corresponding message.
Telenot hipas
Create:
No direct creation possible. Create a new project using hipas software and continue with the import.
Import existing data:
Using drag & drop or via the "Projects/Import" menu, you can simply drag an existing project file into the "Projects Local" window.
Edit:
Double-click to automatically start the "hipas" software. This should have been installed at the original installation location. If it is not installed, you will receive a corresponding message.
Loxone
Create:
No direct creation possible. Create a new project using the Loxone Config software and continue with the import.
Import existing data:
Using drag & drop or via the "Projects/Import" menu, you can simply drag an existing project file into the "Projects Local" window.
Edit:
Double-click to automatically start the "Loxone-Config" software. This should have been installed at the original installation location. If it is not installed, you will receive a corresponding message.
Combined project type:
ETS projects can also be attached to this project type.
Others
We are working on the integration of further project types and are constantly optimizing the existing ones. If you have any ideas or requests, we would be delighted to receive your feedback. Please send us a message via our helpdesk https://helpdesk.SmartHometools.de or by email to HELPDESK@SmartHomeTools.de.
Notes
Each project has notes in order to have the appropriate documentation for further accesses, special features or the IT network to hand.
These can be opened via a button in the "Project selection" menu and you can store any information that is always taken into account when checking in/out.
It is also possible to open the notes of a checked-in project in read-only mode without having to check it out. You will find a corresponding button for this in the "Memory selection" menu.
Passwords
Passwords are increasingly being enforced and regularly requested. This can be annoying during project processing.
The PM offers the option of storing a project password for each project. This can be set in the project settings. You can also create a new password directly. This is automatically generated in a complex 16-digit format. Some problem characters/symbols are not used.
From this point onwards, you can copy the password to the clipboard at any time using a button in the "Project selection" menu and paste it anywhere. This makes everyday life much easier, especially with ETS-Secure and GPA projects. You can also retrieve the password of a checked-in project without having to check out the project. You will find a corresponding button in the "Memory selection" menu.
You can also activate the "Copy password to clipboard" option in the PM settings to automatically copy the password to the clipboard when selecting a project.
If you need a password without having to assign it to a project, you will find a button at the top right of the main menu.
TIP - Always work carefully when assigning passwords. We recommend that you check that you have entered the correct password before carrying out any further work in order to avoid losing data.
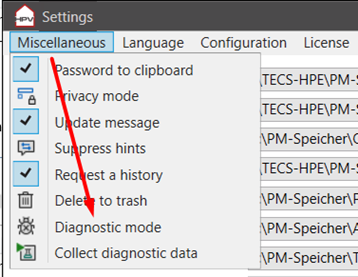
Private-Mode
The privacy mode can be found in settings under “Miscellaneous”. Privacy mode makes the project lists unrecognizable after 15 seconds of program inactivity. To display the lists again, press the button next to the reload button with SHIFT + CLICK.
Remote Access
Remote accesses can be stored for each project, which can be checked into the memory on a project-specific basis and used by all computers and users. For some project types, you then have the choice of whether to use the internal IP addresses or the external path for integrated functions such as QC starters.
Overview
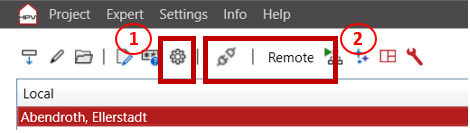
- "Project settings (#1)" This button takes you to the project-specific settings, e.g. to store the connection data and test the connection.
- "Access type (#2)" Choose between "Local" and "Remote" so that the online functions (debug page, QuadClient) use the correct connection. The S1/RA functions are only available with "Remote".
- "Connect/Disconnect (#2)" If the access data is stored, the connection is established and disconnected here.
Connection via Gira S1 or ISE Remote Access
It is possible to establish direct connections to the system via a Gira S1 or ISE Remote Access. The KNX interfaces for ETS, for example, are automatically integrated and any TCP ports are forwarded to the customer's network participants.
If the project type is "Expert", the Expert project is automatically scanned and common ports are set when remote access is activated. This applies to the classic standard ports of the visualization, logic debugger and DCS-IP gateway. Once the ports have been created automatically, they must be updated manually if changes are made.
OvenVPN
An OpenVPN configuration file can be added via the project settings. After selecting the project, you can establish a connection by setting the project to “Local” and pressing the connection button.
Requirement:
OpenVPN GUI at least version 10.50.0.0.
A parallel installation next to e.g. “OpenVPN Connect” is possible.
See - https://openvpn.net/community-downloads/
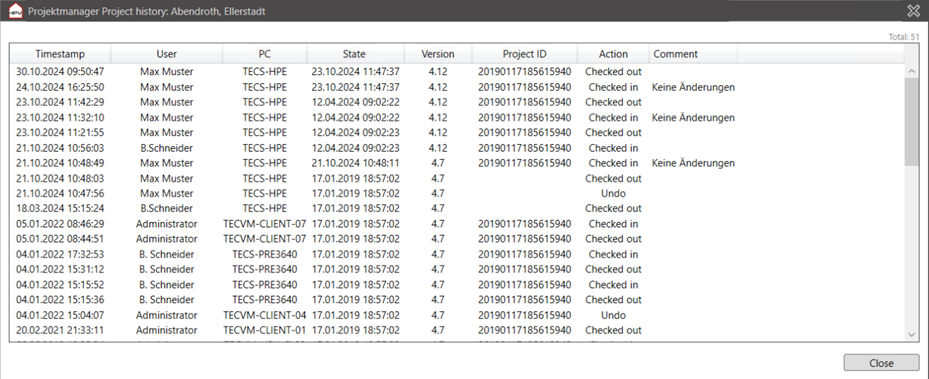
History
A History is automatically maintained for each project in the repository. You can access this after selecting a project via a button in the "Memory selection" menu or by double-clicking.
A History is created as soon as the project is checked in for the first time. If "Request notes" is selected in the settings, a note about the work carried out is requested when checking in. If something has been entered there, a tick appears in the "Notes" column. These can be viewed by double-clicking again.
Settings
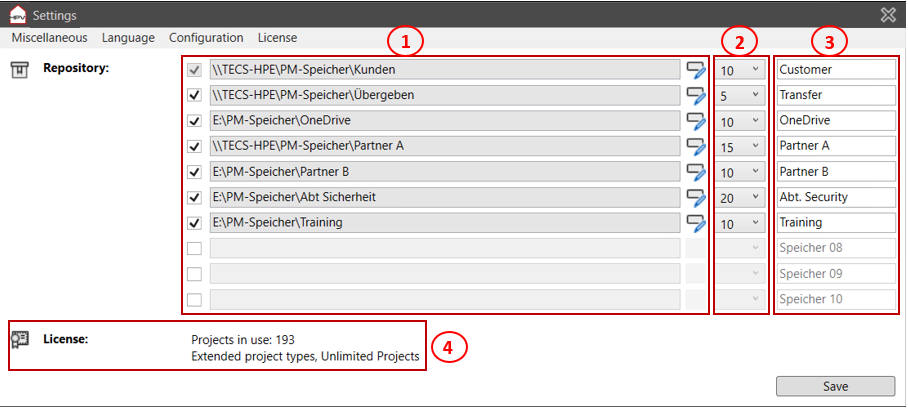
- "Repositories (#1)" The projects are moved to these folders after being checked in to the respective repository. More on this under "Project sharing".
The repository folder should be a network path or a cloud folder that is set up on all computers.
- "Version statuses repository shelf (#2)" Determines the number of project versions in the shelf of the repository. This setting is saved in the repository folder and therefore applies globally.
- "Repository name (#3)" Defines the name of the repository. This is used to the main view and the logs.
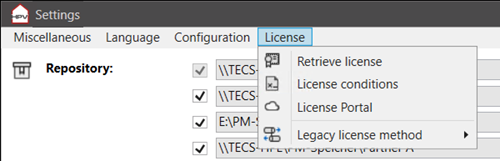
- "Licensing (#4)" Shows whether a license has been purchased/imported for the project manager and how many projects have been activated.
Licensing
Without a license, the PM is in private customer or business customer demo mode.
In this case, it is possible to manage a maximum of 10 projects. This number applies to the number of projects in the central memory.
Details on prices, licenses and ordering can be found at www.SmartHomeTools.de.
When you purchase a license, you will receive access data to our license portal:
https://cloud.SmartHomeTools.de
After logging in, you can check in the menu item "Licenses" whether and which licenses are available for you. To transfer the license to a device, all you have to do is enter the assigned ID, which you will find under your name at the top left, in the software during the license query and follow the instructions. After an email confirmation, the process is complete. Internet access is required at least once for this process.
Trouble Shooting
If the PM does not behave as expected, the following points will help. If you have any further difficulties or questions, please contact HELPDESK@SmartHomeTools.de.
1. Activate the diagnostic mode in the settings menu and save the settings.
The PM then starts in diagnostic mode.
2. Check whether „Diagnostic mode active” is displayed in the footer.
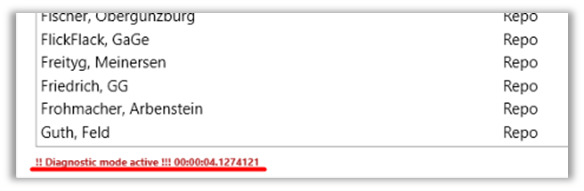
3. The PM now records all actions and events.
Recheck the error, then click on "Collect diagnostic data" and send the file with an error description to our helpdesk at https://helpdesk.SmartHomeTools.de.
You can of course unzip the file in advance and edit it with a text editor, e.g. to delete customer-specific entries such as project names etc. before sending it.
Access-relevant data is automatically made unrecognizable.